
View Gary Lacey's profile on LinkedIn


Showing posts with label gears. Show all posts

Sunday, 2 February 2014

HP LaserJet P3005 - Noisy, Grinding, Clicking, Rumbling

The Hewlett Packard LaserJet P3005 commonly suffers from noises from the back of the printer. These can range from a rhythmic rumbling noise to a loud grinding or clicking noise. It's caused by either the fuser or the fuser drive gears.

UPDATE

If your LaserJet P3005 is suffering from the worn fuser bush problem, HP will now replace the fuser free of charge until 1st July 2013 if the printer has printed less than 150,000 pages.
See this update:


Removing the fuser and drive gears for inspection is fairly easy:

  1. Open the rear door and pull it open past it's stops
  2. Remove two screws
  3. Open, or remove, the paper tray
  4. Open the flap at the bottom of the rear cover, release the two clips at the bottom and pull the rear cover out
  5. Remove the I/O cover (rear left hand cover)
  6. Unplug the cable on the left hand side of the fuser from the power supply and remove it from the cable clip
  7. Unplug the two cables coming from the right hand side ofthe fuser and release one cable clip
  8. Release the two clips on the duplex inlet guide (black plastic guide) and slide it out of the back of the printer
  9. Remove four screws and pull the fuser out
  10. Look inside the left hand side of the printer and you will see four gears
  11. Unclip the top gear at the back of the printer and the gear below it will slide off
  12. Remove the plastic clip holding the upper gear further forward in place and slide off this gear and the one below it
 Remember how these gears go back onto the printer. When you refit the back cover, fit the top into place first.

Inspect the teeth of the four gears for wear. Sometimes, it's hard to see, but you might feel a ridge if you slide a small flat blade along the teeth of the gears. If your printer is getting progressively noisier with a rumbling type of sound, it's probably one or more of these gears worn.

*There are affiliate links in this post.*

These are the part numbers for the gears:

RU5-0956-000CN, RU5-0957-000CN, RU5-0958-000CN, and RU5-0959-000CN.

Usually, the only gear you will need to replace is the lower one towards the front, the 20 tooth gear RU5-0957-000CN.

Don't forget to put some grease on the new gears.

There are two things to check on the fuser.

 First check the light brown coloured gear. Check the teeth for wear.

Second, check the green plastic bush that the metal shaft rotates in. Push upwards firmly on the gear. If there is excessive movement, the bush is worn. You might also see green powder sitting on the bottom of the fuser. The worn bush will cause a loud clicking noise as the gears are being forced apart as they turn.

The part numbers for the fuser are:

RM1-3740-030CN For 110-127 VAC and RM1-3741-030CN For 220 VAC to 240 VAC.
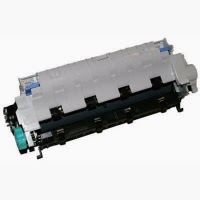
Hewlett Packard P3005 Fuser

If you have to do the repair yourself, you will need a fuser:
RM1-3740-030CN - Fusing assembly - For 110-127 VAC
RM1-3741-030CN - Fusing assembly - For 220 VAC to 240 VAC

You can save some money if you are able to dismantle the fuser and replace the two bushes, assuming the rest of the fuser is ok.
BSH-P3005-PL Bushing Pressure Roller Left
BSH-P3005-PR
BSH-P3005-PR

and
BSH-P3005-PR Bushing Pressure Roller Right
RM1-3740-FM3
RM1-3740-FM3

The only other thing you might need if you are reparing the fuser is the fuser film sleeve. These sometimes get torn.
RM1-3740-FM3 - Fuser Film Sleeve

Thursday, 30 January 2014

HP LaserJet 5 - Grinding Noise And Paper Jamming

A grinding noise and paper jamming at the fuser in a Hewlett Packard LaserJet 5 is more than likely caused by the drive train gear cluster.

Open the rear door on the printer, remove two screws, and then pull the fuser out. Shine a torch into the back of the printer and look at the condition of the gear that drives the fuser. You might see that some of the teeth on this gear are worn or completely missing.

The part number for the drive train gear cluster is RG5-0876-050CN. Hewlett Packard list this part as discontinued but you might be able to find a supplier that can sell you one.

Before you buy this part, check the condition of the fuser. Check the gears and the surace of the heater roller. If the fuser is worn as well, you will need to price this up as well. Bearing in mind that this printer is now over ten years old and probably in need of a complete clean and service , it might be time to buy a new model.

If you decide to replace the part, this is what's involved:

  1. Remove the fuser as previously described
  2. Undo one screw at the back of the right side cover and slide the cover off
  3. Undo the screw on the memory cover on the formatter assembly and remove the cover
  4. Remove four screws on the side and two at the back of the formatter assembly and pull the formatter assembly off
  5. Remove one cable and four screws from the main motor and then lift the motor away
  6. Remove two screws and the drive train gear cluster will slide out the back of the printer
 Before fitting the new part, check that it is lubricated. If not, apply some grease to the gears. Also, make sure it is seated properly before fitting and tightening the screws.

*There are affiliate links in this post.*

RG5-0876-050CN
RG5-0876-050CN
 
RG5-0876-050CN - Gear cluster (drive train) assembly

One thought on “HP LaserJet 5 – Grinding Noise And Paper Jamming”

Bobby Dee Myers
i have a 2605DN and am having trouble with the manual feed. to achieve the process in manual tray 1 of an envelope i am directed to hit the green button. after this it will print but sometimes it also picks up a sheet from tray two and prints on it leaving the envelope that fed behind it blank
 

Tuesday, 21 January 2014

HP LaserJet 4250 4350 - Grinding And Knocking Noise

If you get a grinding and knocking noise from a HP LaserJet 4250 or 4350, the problem is the swing plate assembly and / or fuser. The swing plate assembly is a metal bracket with two plastic gears on it and drives the fuser.

The problem is that the teeth on one or both of the gears wear. You might also find that the plastic clip that holds the fuser in place cracks. The new swing plate assembly is modified to reduce the wear on the gears. It is also supplied with a modified two part spring loaded fuser gear. The new fusers are also modified with a metal insert inside one of the plastic clips to stop it from breaking.

The good news is that HP will send an engineer out to repair it free of charge even if it is out of warranty. Tell them it is making a grinding noise from the back of the printer and that you have tried reseating the fuser. If they tell you the printer is out of warranty, remind them that there is a service note that covers this fault.

Update
As of January 1st 2010, HP are no longer repairing this fault free of charge so you will have to do it yourself or take your printer to someone who can do it.

If you decide to repair the printer yourself, there's a right and wrong way to do it.

The one gear can be changed very quickly by removing the formatter cover, formatter assembly, rear door, and fuser. Behind the formatter, you will find a black screw. After removing this screw, the gear can be removed from the back of the printer.

The problem with doing it this way is the printer will still be noisy if the other gear that you can't see is worn.

The best, and correct, way to do it is to replace the whole swing plate assembly which requires removing the power supply board and is quite a lengthy process.

Briefly, what you have to do is; remove the top cover, both side covers, rear door, and fuser. Disconnect the cables from the power supply board at the dc controller. Remove six screws and an earthing screw holding the power supply board in. Remove the power supply board from the back of the printer.

The swing plate assembly can then removed from inside the printer by removing the three black screws. These are hard to get to and can be tight and are easy to round off. The swing plate is also tricky to get in and out of the printer.

If you get a genuine HP part, it should already have some grease on it. If you get a cheap compatable part, you might need to grease it yourself.

When you tighten the screws holding the power supply in place, pull upwards on the power supply. This moves the fuser gear closer to the swing plate gear.

Fit the new fuser gear supplied in the kit onto the fuser. Don't forget to check the plastic retaining clips on the fuser. If they are broken, the fuser will need to be replaced.

Hopefully, your printer should now work, and should be a lot quieter.

 *There are affiliate links in this post.*

HP LaserJet 4250 4350 Fuser


2 thoughts on “HP LaserJet 4250 4350 – Grinding And Knocking Noise”

Dave
Great post, maybe you could give us the part number of the swing plate?

admin
The HP part number is 5851-2766.
The description for the part:
Swing plate assembly – For Tray 2 paper lift assembly – Located between the main gear assembly and the fuser, just above the power supply – Contains swing plate assembly and new fuser pressure release gear .
is incorrect, it has nothing to do with the Tray 2 paper lift assembly.